Plugin Goal
We will create a WordPress plugin that uses VueJS on the frontend and communicates with the backend using WP AJAX. This example is structured and uses object-oriented PHP.
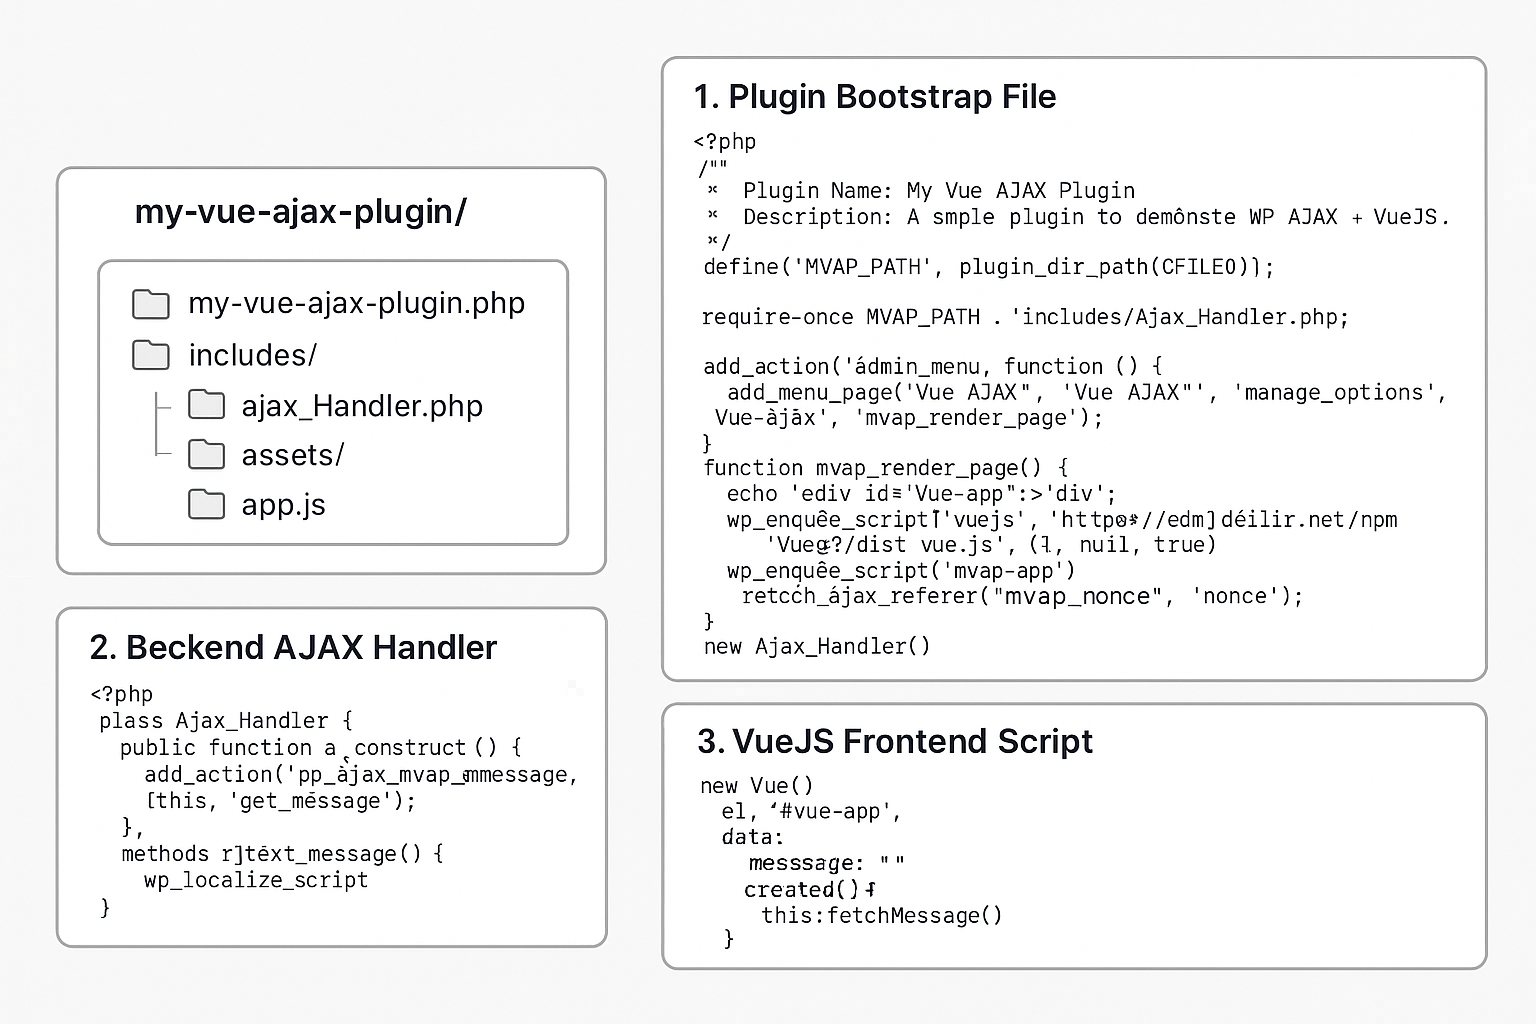
File Structure
my-vue-ajax-plugin/
├── my-vue-ajax-plugin.php
├── includes/
│   └── Ajax_Handler.php
├── assets/
│   └── js/
│       └── app.js
1️. Plugin Bootstrap File
This file initializes the plugin, adds the menu page, and loads VueJS and our script. It also sends WordPress data to the Vue app.
<?php
/**
 * Plugin Name: My Vue AJAX Plugin
 * Description: A simple plugin to demonstrate WP AJAX + VueJS.
 */

define('MVAP_PATH', plugin_dir_path(__FILE__));

require_once MVAP_PATH . 'includes/Ajax_Handler.php';

add_action('admin_menu', function () {
    add_menu_page('Vue AJAX', 'Vue AJAX', 'manage_options', 'vue-ajax', 'mvap_render_page');
});

function mvap_render_page() {
    echo '<div id="vue-app"></div>';
    wp_enqueue_script('vuejs', 'https://cdn.jsdelivr.net/npm/vue@2/dist/vue.js', [], null, true);
    wp_enqueue_script('mvap-app', plugin_dir_url(__FILE__) . 'assets/js/app.js', ['jquery'], null, true);
    wp_localize_script('mvap-app', 'mvap_ajax', [
        'ajax_url' => admin_url('admin-ajax.php'),
        'nonce' => wp_create_nonce('mvap_nonce')
    ]);
}
2️. Backend AJAX Handler
This object-oriented class listens for AJAX requests and returns a message. The nonce ensures request security.
<?php
class Ajax_Handler {
    public function __construct() {
        add_action('wp_ajax_mvap_get_message', [$this, 'get_message']);
    }

    public function get_message() {
        check_ajax_referer('mvap_nonce', 'nonce');
        wp_send_json_success(['message' => 'Hello from the server!']);
    }
}
new Ajax_Handler();
3️. VueJS Frontend Script
This script renders the VueJS app and calls the backend using fetch(). The returned message is shown dynamically.
new Vue({
el: '#vue-app',
data: {
message: ''
},
created() {
this.fetchMessage();
},
methods: {
fetchMessage() {
fetch(mvap_ajax.ajax_url + '?action=mvap_get_message&nonce=' + mvap_ajax.nonce)
.then(response => response.json())
.then(data => {
if (data.success) {
this.message = data.data.message;
}
});
}
},
template: '<div><h2>{{ message }}</h2></div>'
});
Plugin Interface Example
The admin page will show the Vue interface with a greeting fetched from the backend.
How It Works
Let’s dive deeper into each component to understand how it works together.
1. PHP Plugin Entry Point
This file bootstraps your plugin. It registers a new admin menu item and enqueues both VueJS and your custom script. The wp_localize_script is crucial as it passes WordPress data (like admin-ajax.php and nonce) to the Vue app.
2. The Ajax_Handler Class
This class is responsible for listening to WP AJAX calls. Using wp_ajax_* hooks ensures that only authenticated users can make requests. Always verify with check_ajax_referer to protect from CSRF attacks.
3. VueJS App Overview
VueJS renders content inside the admin interface. Upon creation, it sends a fetch request to your PHP handler via admin-ajax.php, receives a JSON response, and updates the interface accordingly.
Expand It Further
- Move Vue into a single file component and use Webpack/Vite for compilation.
- Use the REST API instead of admin-ajax.php for better architecture.
- Add more interactivity (forms, lists, filters, etc.).
Use Cases
- Real-time stats dashboards
- Dynamic custom settings panels
- Vue-powered forms inside WP Admin
- Custom WooCommerce management tools
Next Steps
Now that you have a basic working structure, you can continue improving this plugin by:
- Splitting Vue components into single-file components (with a build process)
- Adding authentication and roles logic
- Using the REST API instead of admin-ajax.php
Tips for Beginners
- Use
console.log()in the browser anderror_log()in PHP to debug. - Sanitize and validate all inputs on the PHP side.
- Use WordPress REST API for more scalable frontend apps.